If you were directed to this page, it is most likely because we are already working together to create a new online space for you.
{If we are not yet working together, contact us here to correct that! 😉 }
The first step in the process is to establish a host account for your site. WordPress.org requires a hosting service to “house” your site files. Think of it like the external hard drive for your website – the host account is the “drive” where your website files will live. The files are all completely yours, unlike Blogger, WordPress.com, Wix, Squarespace, or similar websites, and we will have complete control over your site and your information.
There are many different companies you can use for hosting your WordPress website. We can recommend several, but for the purpose of this tutorial, we will limit that list to the three we most prefer.
Let’s get started…
Cloud And/Or Managed Hosting
To define cloud-based or managed WordPress hosting quickly, this hosting option is a bit more hands-free for its customers. The host company is generally responsible for basic tech support, software updates, server health monitoring, site speed, and so on, along with premium support options. You can read a hosting comparison here for more information.
MRM currently offers cloud and managed hosting options, primarily for our site care clients, through BigScoots, which allows us to be a bit more selective about the websites housed on our servers and provide customized service to meet the specific needs of our clients’ sites. BigScoots is a fantastic service, with prompt customer service and tech support, along with individualized care for the websites we host. Paired with Cloudflare for DNS management, this option ensures the fastest load times and optimal website performance for our clients.
If you are interested in this option for your new website, please let us know. We are happy to discuss whether or not this is a good fit for you and your new website and to provide directions for the setup required.
Shared Hosting
Shared hosting is quite common for brand new websites. As the name implies, shared hosting is when multiple, typically smaller, websites share one large server. Having multiple sites on one server allows the host company to provide their service at lower rates, so this is often the more affordable option for many of our clients.
Flywheel
MRM is an agency partner with Flywheel, formerly a cloud hosting company and one we highly recommended to our clients for years. Flywheel was recently acquired by WP Engine and shifted their hosting model and plans significantly. Though some smaller scale individual hosting plans are still available, Flywheel now focuses more on higher tier shared hosting plans for agencies and freelancers, for more static websites.
SiteGround
Our personal favorite for shared hosting is SiteGround. Their rates are affordable, customer service is excellent, and tech support is easy to access and very prompt. To date, we have not experienced any issues with their servers going offline, even during standard updates.
To begin with SiteGround –
(1) Go to SiteGround, and choose your plan.
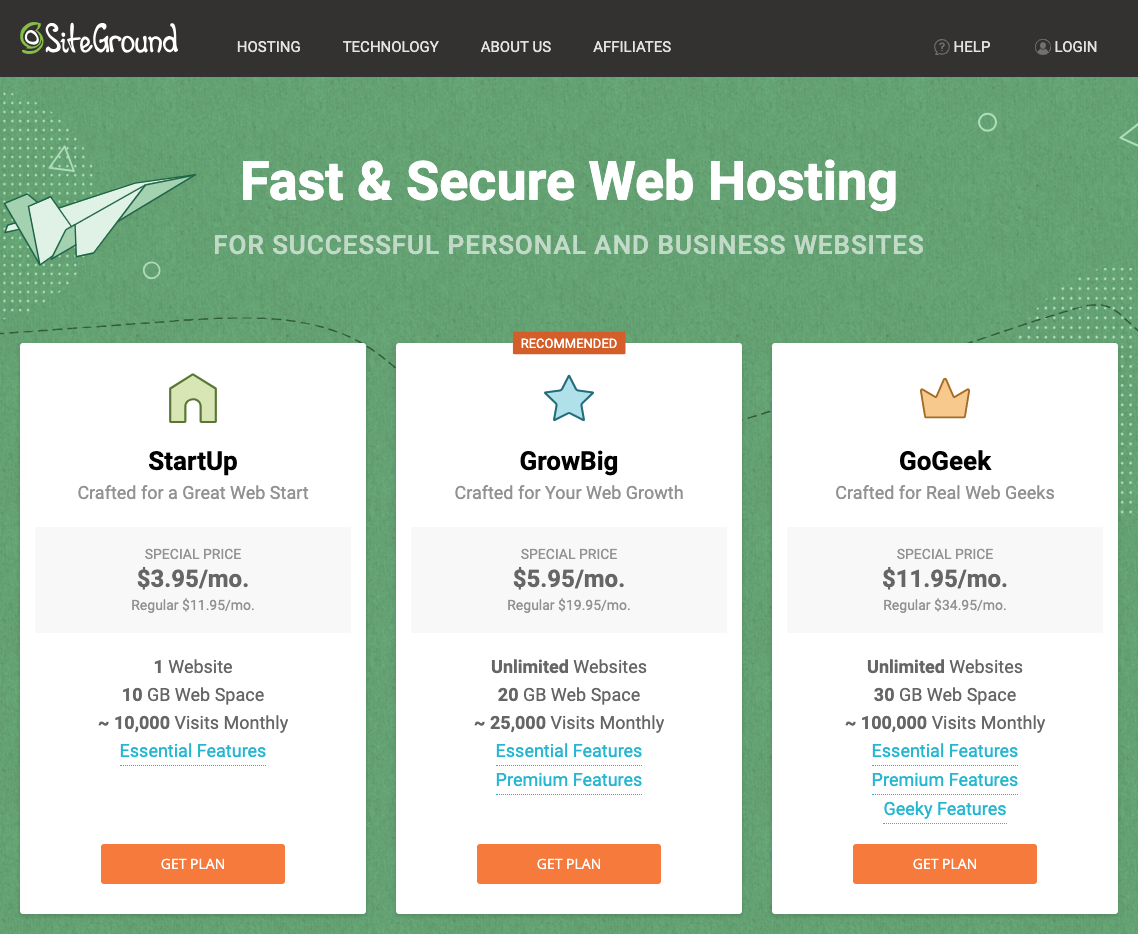
This plan can be upgraded or downgraded at any time, if necessary. We recommend the GrowBig Plan for most of our clients. The extra space and list of premium features are worth the couple extra dollars per month.
These prices listed here don’t vary often, but occasionally will change if there is a sale or special on hosting plans.
(2) The next step is to choose a domain name, or to enter your existing domain name.
If we have not already discussed which domain to use, feel free to reach out for input. Otherwise, you can choose to use a domain name you already own, or to purchase a new domain.
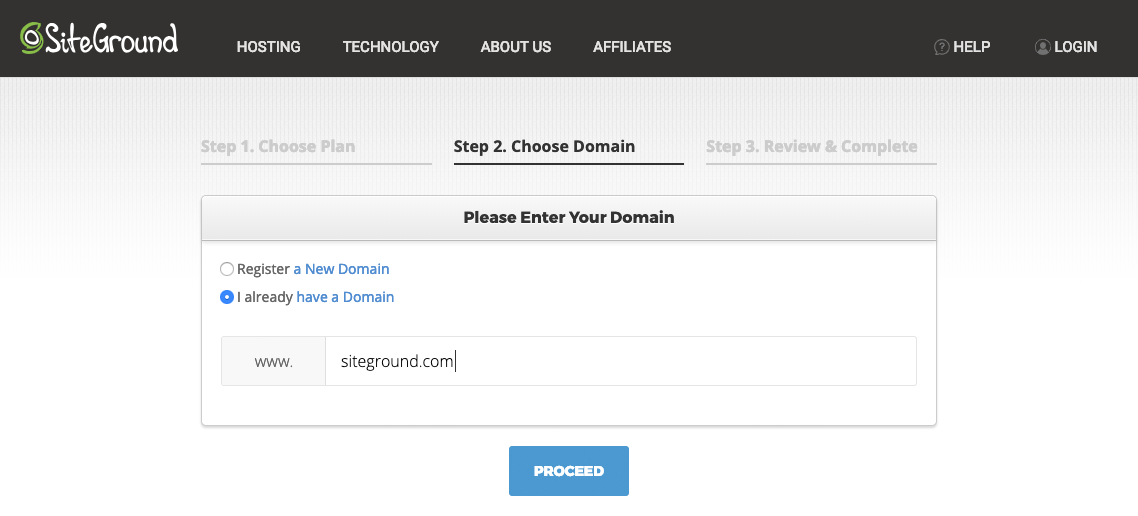
Enter your domain name, and then click “Proceed”.
(3) On the next page, enter your account information, contact information, and payment method. Be sure to use all current contact information, as this is how SiteGround will contact you and where all account confirmations will be sent.
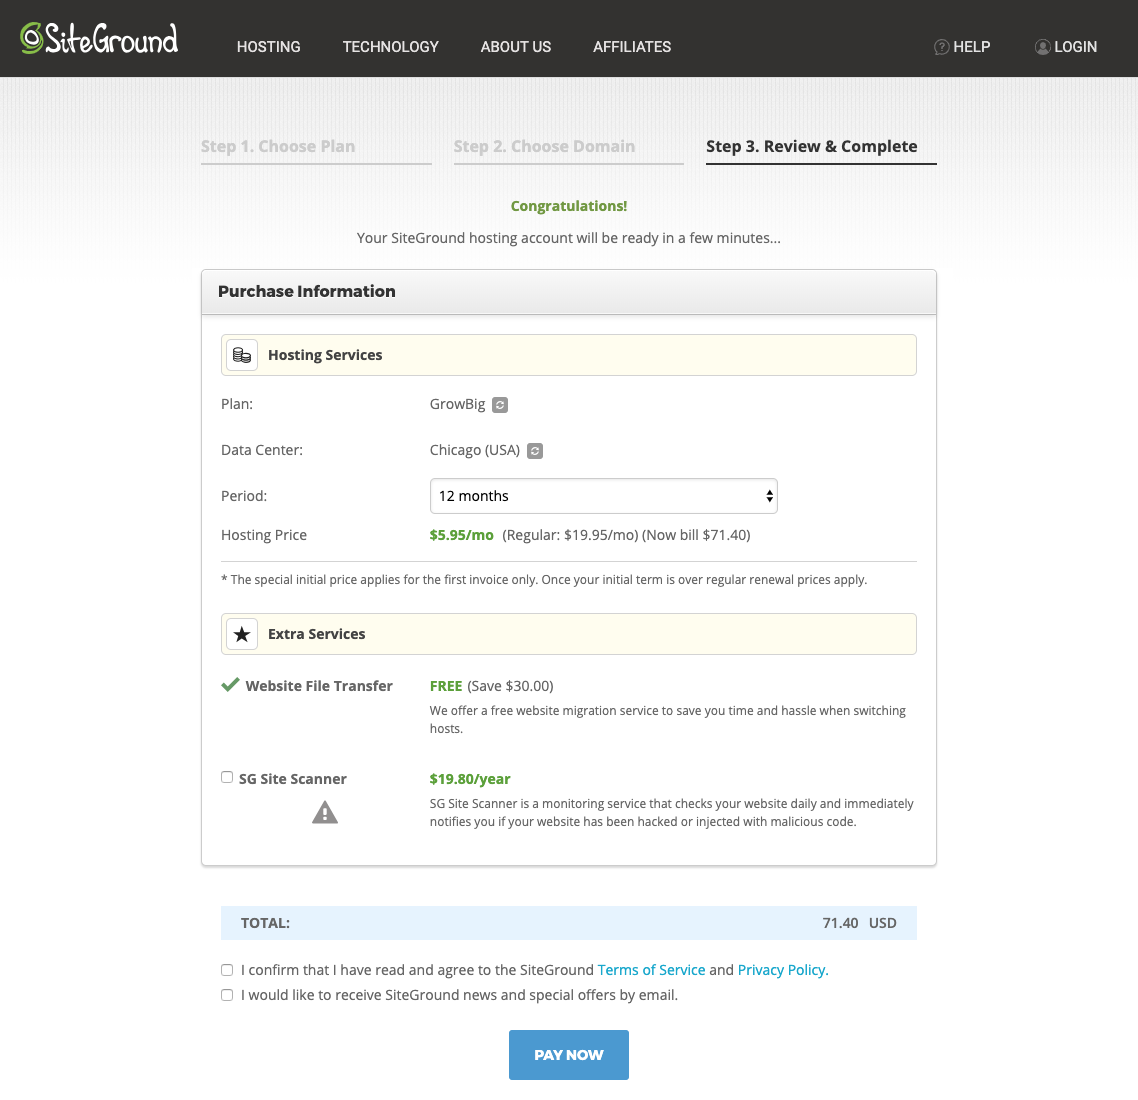
Below the payment information, you will choose the details of your hosting package. We generally recommend choosing a minimum of 12 months for hosting. There is no discount for longer account terms, so choose whatever works best for you for now.
Be sure to choose at least the Domain Privacy option along with your plan, so your billing and payment information is kept secure. (If you are not registering a new domain, you will likely not see the Domain Privacy option at all because this would have been something you chose when you first purchased the domain.)
Once you have selected the necessary options, check to accept the terms of service, and then click “Pay Now”.
CONGRATS! You just purchased the hosting necessary for us to begin!
(4) The last step is to forward the confirmation messages and your account login credentials to our team ([email protected]) so we can take it from there!
We are so excited to move forward with your project!
Other Hosting Options Our Clients Use
Disclosure: The links in this tutorial are affiliate links, which means – at no additional cost to you – we will earn a small commission when you purchase or sign up through these links. We recommend these services because of our own positive experience with them and appreciate your support in this way.